Grunge it up card

Click on the image and see how this was made. There is a video tutorial of the process.

In My Garden card

Click on the image and see how this was made. There is a video tutorial of the process.

Timeless Treasure art journal spread

Click on the image and see how this was made. There is a video tutorial of the process.

Father's day card

Click on the image and see how this was made. There is a video tutorial of the process.

Distress it card

Click on the image and see how this was made. There is a video tutorial of the process.

Monday, March 30, 2020

Spring Butterfly card with video tutorial

http://www.simonsaysstampblog.com/mondaychallenge/
Hi everyone,

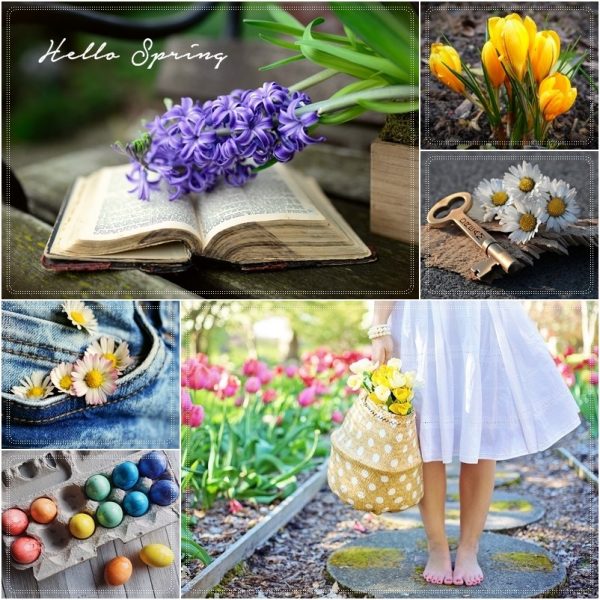
It's Monday and that means a new Simon Says Stamp Monday Challenge! This week it's all about "Spring Mood Board". The lovely Macarena has made this gorgeous mood board for our inspiration!


Spring has finally arrived, my favorite season of the year. It is a pity that due to the circumstances we can't enjoy it as usual, but our health and safety is much more important. For this card I was inspired by Tim Holtz's Distress Crayons Facebook Live and used the brightest colors of Distress Crayons I have.

Monday, March 23, 2020

Urban Steampunk card with video tutorial

http://www.simonsaysstampblog.com/mondaychallenge/
Hi everyone,

It's Monday and that means a new Simon Says Stamp Monday Challenge! This week it's all about "Steampunk".


For this week I was inspired by the new Tim Holtz Urban Layers ephemera, and used it for this Steampunk challenge. I started with light grey and brown colors for the background such as Distress Inks in Pumice Stone, Hickory Smoke, Frayed Burlap and Walnut Stain. With the Faded Type stamp set I applied some text.
 

One on of the Urban Layers, the Volt meter, I gave a a thick coat of Glossy Accents and I'll give you  a small tip, stick it on a piece of thick cardboard, so that it doesn't curl up by all the moist of the Glossy Accents. I saw it just in time while it was drying and I managed to stick it down without damage. After the Glossy Accents dried, I applied a coat of Distress Crackle Rock Candy. It becomes milky for a moment, but it disappears when it dries and start to crackle.
The Glass one I grunged up with Grit Paste and made it a bit of a shabby with Distress Paint Black Soot and Metallique Paint Rustic Brown.


To really make it more Steampunk, I used the Gearhead die set and also added some Grit Paste and painted it black (again), and gave it a rusty effect with Metallique Paint Steampunk Copper and Rustic Brown.


VIDEO:


SUPPLIES:


50dollar_voucher_600px
To join in all you need to do is make a project that fits this weeks challenge and you can be the winner of the $50 gift voucher that our amazing sponsor Simon Says Stamp offers. This prize will go to a random entry. So go over to the Simon Says Stamp Monday Challenge blog, let the DT members inspire you and join in the fun!
http://www.simonsaysstampblog.com/mondaychallenge/
You have until Monday 8am Ohio time. 1pm UK time, 2 pm CET to join in.

Follow Simon Says Stamp on Instagram
Instagram
If you use instagram add #sssmchallenge to your challenge entry uploads so we can see them on there too!

http://www.simonsaysstamp.com/

Thank you for stopping by! Love to see you next time!

Hugs,
Sandra

Monday, March 16, 2020

Botanical Stencil card with video tutorial

http://www.simonsaysstampblog.com/mondaychallenge/
Hi everyone,

It's Monday and that means a new Simon Says Stamp Monday Challenge! This week it's all about "Stencil Fun".


These are weird times right now, and it's good to be able to do and think about something else, like playing with stencils! I started with a sheet of Heavystock and used Distress Ink Walnut Stain and Ground Espresso together with Distress Spray Stain Peacock Feather and Distress Oxide Spray Peeled Paint. Because I don't really like the spray look, mostly because I don't like the results I'm getting, I applied the sprays together with the Distress Inks on my Craft mat. And I was very surprised by the colors I got with this technique, they were more brighter then I would have thought.

Monday, March 9, 2020

Green Easter card with video tutorial

http://www.simonsaysstampblog.com/mondaychallenge/
Hi everyone,

It's Monday and that means a new Simon Says Stamp Monday Challenge! This week it's all about "A Bit O' Green".


For this challenge I made a green Easter card. In the Netherlands we don't celebrate St. Patrick's day, but we do celebrate Easter. I started by applying some texture with the Tiles stencil and Texture Paste. Then I applied the first shades of green with Opal Magic Paint Green-Gold. Because I wanted to work with paint and pigment powder, I think it would work better to use something like a primer, so I applied a layer Clear Gesso.

Monday, March 2, 2020

Nutty Professor tag with video tutorial

http://www.simonsaysstampblog.com/mondaychallenge/
Hi everyone,

It's Monday and that means a new Simon Says Stamp Monday Challenge! This week it's all about "Tag it".

As it’s the first Monday of the month we are showcasing a brand/company. This week we are all using some fabulous products from Tim Holtz! You don’t have to use them to join in with the challenge but if you have them we would love to see them used.


The Professor wanted to come out and play again and for this Tag it challenge with Tim Holtz products, I totally agreed. I first stamped him on the tag, then on the Masking Paper, and cut him out and adhered it in place. Then repeated this with the large round stamp of the same The Professor stamp set. Then stamped the background with different stamps.